Yihui Xie | Highlights of the Knitr Package | Posit (2022)
videoimage: thumbnail.jpg
Transcript#
This transcript was generated automatically and may contain errors.
Hi everyone, this is Yihui Xie. Sorry that I can't attend the RStudio conference in person this year, but I guess you won't miss anything from this talk with my absence. Well, if you really miss my face, you can simply google for my picture and stare at it for 20 minutes along with this talk.
So there are people who are really familiar with my previous talks and work on the so-called down packages. They are so familiar that every time they meet me, they don't greet me with the usual what's up. Instead, they say, what's down? Well, this time I'm not going to talk about any down packages. I won't let you down as usual.
So what's down? Nothing is down. What's up? Quarto is up. So most down packages have had or will have equivalents in Quarto, which you might have heard for several times at this conference. And I need to, I probably should clarify that the down packages won't be down anytime soon. We will continue to maintain them.
So why am I talking about Knitr today? Because the Knitr package is a common cornerstone of Quarto and rmarkdown. So both of them are built on top of Knitr. So you can apply what you have learned today about Knitr in this talk to both Quarto and rmarkdown documents.
So Knitr has existed for a little over 10 years. So the development started in 2011. And I made the first crane release in January, 2012. Over these years, I have made more than 50 crane releases. And there have been more than 5,000 questions on Stack Overflow and more than 2,000 GitHub issues and pull requests. I would also like to thank all the Knitr contributors, and there are more than 100 of them.
Since the pandemic, I have almost lost track of time. So basically, I want to look back and see what I have done in the past two years, whether I have done anything meaningful. So as I said, Knitr is over 10 years old. So it has become quite mature and probably inevitably boring as time goes by. When things become mature, they often become boring too, just like adults, kids are much more fun. Yeah, for software, being mature is not bad, it's actually a good thing.
In this talk, I'm not going to talk about any totally exciting new features because there are not any huge new features in recent years in the development of Knitr. But I would like to highlight a few little things. So for a full list of changes and new features, you can check out the release notes of Knitr later.
New way to write chunk options
So the first thing I want to highlight is that now you have a new way to write chunk options. Previously, you must write all chunk options on one line in the chunk header. Now you can write them on multiple lines as special comments in the beginning of the chunk body. So this special comment starts with the hash character followed by the pipe character. I'm not sure how would you pronounce this combination. Maybe hashpipe? I remember someone mentioned to me that hashpipe was a funny coincidence. Since I'm not a native English speaker, I had no idea what hashpipe means. So I googled for that and I regret it.
Anyway, hashpipe comments, you can use that to write chunk options. So as I said previously, you have to force all the chunk options onto a single line, which is sometimes very awkward. If you have many, many chunk options for a single chunk, there will be an awkward horizontal scroll bar. But now you can write all of your chunk options can write with your chunk body. You can put them inside the chunk after the special comments. And you can also hard wrap all these lines freely. You can write them on any number of lines.
And alternatively, you can also use the YAML syntax to provide your chunk options. So previously I'm showing the old syntax of comma separated chunk options of the form option equals value and separated by commas. If you're familiar with YAML, you know that syntax will be option colon followed by value. And you have to write one option per line. For Quarto and RStudio or VS Code users, I strongly recommend that you use the YAML syntax because the editors, RStudio and VS Code, they have better support for the YAML options. For example, they can help you autocomplete the option names. They can validate the values of your options. And second, the YAML syntax works for other engines in Quarto as well, such as Jupyter.
So if you want to convert the old syntax to the new syntax, there is a function named convertChunkHeader in Knitr. So you can use that function to convert your old rmarkdown documents to using the new syntax for chunk options. This requires a very recent version of Knitr.
Reusing chunk options and content
And the second thing I want to talk about is how to reuse both chunk options and chunk content from other code chunks. Previously, there existed several ways to reuse the content of a code chunk. For example, through the ref.label option. So suppose you have one code chunk with the label chunk A, and then you can write another code chunk with the label chunk B, but set the chunk option ref.label equals chunk A. ref.label equals chunk A, that means I want to copy the chunk content of chunk A into chunk B. So now, although you see the chunk B is empty here, but when you execute this document, chunk B will have the same content as chunk A. You can learn more about reusing the chunk content in the rmarkdown cookbook.
So now, in addition to reusing the content of code chunks, you can also reuse chunk options from other code chunks. And this can be done through the chunk option ops.label. So for example, you have chunk A here, and you have set a couple of chunk options on chunk A. And if you want to use the same chunk options in chunk B, then you simply can set ops.label equals chunk A. So instead of repeating all the chunk options from chunk A, you simply set a single option, ops.label equals chunk A. And then chunk B will use the same chunk options as chunk A.
Then, if you want to reuse both chunk options and the content from other code chunks, you can set the chunk option ref.label to the label of other code chunks, and then wrap the labels in the function I. For example, here I have chunk A, which has a few chunk options, and then it also has some chunk content. And then in chunk B, I set ref.label equals I chunk A. That means I want to use both the content of chunk A and the chunk options of chunk A. So in that way, you don't have to repeat everything from chunk A. You simply set a single option, and Knitr will copy everything to chunk B.
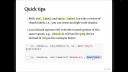
So I also want to share two quick tips. First, the chunk options ref.label and ops.label can take a vector of chunk labels. That means you can reuse multiple code chunks instead of a single one. Second, you can provide further local chunk options. If a code chunk has some local chunk options, they will override the reused options of the same names.
So in this example, chunk B is basically reusing both chunk options and the chunk content of chunk A, but it has set a local chunk option dev equals png. So since we have borrowed all the chunk options from chunk A, which includes the chunk option dev equals svg. So now chunk B, since chunk B has a local chunk option dev equals png, this dev equals png will override the dev equals svg from chunk A. So basically, local chunk options will have higher priorities if you reuse chunk options from other code chunks.
So basically, local chunk options will have higher priorities if you reuse chunk options from other code chunks.
New chunk options
Third thing I want to mention is the new chunk options in Knitr in recent years. We have added a few of them, but today I'm just going to mention one of them here, which is the file option. So sometimes you may want to develop code in an external script and include it in code chunk. Previously, what you could do is to use the chunk option code. So for example, here I'm using the chunk option code that takes the value from readlines.script.r. So that basically means I want to read an external script and pass the content of that script to the code option, and then Knitr knows, okay, I will use the content of that script as the content of this code chunk. That's the previous way of including external scripts into a code chunk.
Now this can be simplified to the chunk option file. So you can set file equals a file path, for example, script.r. So basically that's equivalent to using code equals readlines.script.r before. And this file option also supports a vector of file paths. For example, you can pass two scripts to the file option and the file option will read both of them into the code chunk.
New engines in Knitr
The fourth thing I want to highlight is some new engines in Knitr. The first one is the comment engine. You can use the comment engine to comment out any content. And the content can contain basically anything, including code chunks or inline R expressions or other paragraphs or anything. So basically there's one rule that you have to remember. If the comment contains like three backticks, and then for the comment engine, you have to start with four backticks. So basically the rule is that if your comment contains N backticks, then the comment engine needs to start with N plus one backticks. So if the content is commented out, it will not be included in the output.
The second engine is the verbatim engine, and this can be very useful when you want to write tutorials on rmarkdown. You may want to display some content verbatim, especially the code chunks. When you want to display a code chunk verbatim, you can use the verbatim engine. And the rule is the same. So for example, here I'm including a code chunk with three backticks, and then the verbatim engine needs to start with four backticks. For the verbatim engine, depending on the language of the content, you can set a syntax highlighting language through the chunk option lang. So for example, here I'm using lang equals Markdown. That means the verbatim content here is Markdown code, but this lang option is optional. So it depends on whether you want syntax highlighting in your output for the verbatim content.
Previously, I have introduced some old ugly hacks on how to show content verbatim, and now you can forget all of them. And here, I just, yeah, I don't want to explain this anymore. This is just too ugly. Use the verbatim engine and forget about the old ugly hacks.
Use the verbatim engine and forget about the old ugly hacks.
The third engine that I want to show is the embed engine. You can use the embed engine to embed external files, text files actually. You can embed external text files and display their content verbatim. So this is similar to the verbatim engine, but you can use the file option to embed external files. So you don't have to write the content in the chunk body. You just point the file option to some file paths. And alternatively, you can write file paths in the chunk body of the embed engine. For example, you can write quote foo.r, quote bar.r. So the second way has a tiny advantage. That is, if you write in the chunk body, if you write the file paths in the chunk body, your editor, for example, RStudio, may be able to autocomplete the file paths.
The last engine that I want to show here is the exec engine. So this engine allows you to execute an arbitrary system command on a file that contains the content of the chunk. So that command can be specified through the chunk option command. For example, I have an exec engine here, and I'm using the command equals bash. That means I want to run the command bash on the command that I specified in the chunk body. So basically, when Knitr sees an exec chunk, it will write the chunk body into a file and execute a command on that file. So for this bash example, actually, you don't have to use the exec engine. You can simply use the existing bash engine in Knitr. So these two code chunks are pretty much equivalent.
There have existed a lot of command-based engines in Knitr, for example, awk, or go, or perl, or zshell. From now on, we no longer need to add a new engine for every single command. You can basically use the exec engine to execute any command. And by the way, the exec engine is also extensible. If you're interested, you can go back and check out the example through the link here.
For those who are curious about how the exec engine works, basically, Knitr will execute a command of the form command args1 args2, where args is a file path, and this file contains the content of the code chunk. And args1 and args2 are optional command-line arguments that you may specify through the chunk option engine.ops. So here I have an example that executes the grep command with a few command-line arguments dash i, which means case-insensitive matching. And then the pattern is he. And I want to execute grep on the four lines of text here. So, you know, he will, if you match he in case-insensitivity, it will match the first line, hellos, and the third line, since it has the, which contains he.
Recap
And just a quick recap, we have talked about four things in today's talk. First thing is that you can use hashpipe comments in the chunk body to write chunk options. Then you can use ops.label and ref.label options to reuse both chunk options and content. And third, you can use the file option to read external files as the chunk content. And last, we have introduced a few new engines in Knitr. That's all I have for you today. Thank you very much, and happy knitting!
